- Product
Kindling
Product Overview
Sophisticated security with unmatched simplicityCloud SIEM
Pre-configured detections across your environmentHoneypots
Deception technology to detect lateral movementEndpoint Visibility
Real-time monitoring with added detection & responseSecurity Reports
Data visualizations, compliance reports, and executive summariesAutomated Response
Detect, prioritize, and neutralize threats around the clockIntegrations
Cloud, on-prem, and open API connectionsXDR Platform
A complete view to identify risk, and things operational
- Pricing
- Why Blumira
Why Blumira
The Security Operations platform IT teams loveWatch A Demo
See Blumira in action and how it builds operational resilienceUse Cases
A unified security solution for every challengePricing
Unlimited data and predictable pricing structureCompany
Our human-centered approach to cybersecurityCompare Blumira
Find out how Blumira stacks up to similar security toolsIntegrations
Cloud, on-prem, and open API connectionsCustomer Stories
Learn how others like you found success with Blumira
- Solutions
- Partners
- Resources
January 13, 2023
From tracking down where users are logging in from, to monitoring your DLP policies, the unified audit log in Microsoft 365 is a powerful tool to have in your repertoire as a Microsoft 365 administrator.
Here, we’ll walk you through different options on searching the unified audit log to detect potentially malicious activity.
What is the Unified Audit Log?
Microsoft 365’s unified audit log is the method by which all Microsoft 365 logs are aggregated. Most Microsoft 365 products are included within the unified audit log, including OneDrive, SharePoint, Microsoft Teams, SharePoint Online, Exchange Online, Azure Active Directory (Azure AD), and more.
Each service or category of logs contains a subset of record types. Azure AD, for example, contains STSLogon, AccountLogon, and general Azure AD logs as part of its category. Having all of these various categories and record types under a unified log makes it easier to search, collect, and — more importantly for administrators setting up a tenant — configure.
Why it’s Important to Search the Unified Audit Log
An audit log search can help you find nefarious activity, discover persistence from a threat actor, or uncover potentially malicious forwarding rules.
If you have policies in place, alerts may bring these to light for you. However, Microsoft’s own alerting tools can be cumbersome and sometimes unnecessarily complex. Remember that threat actors can be external and internal. Behavior and patterns can go undetected depending on how you’ve configured your tenant and its policies.
Why Is It Important To Retain Office 365 Logs? Learn More >
How To Search the Unified Audit Log
Generally speaking there are three different methods to search the unified audit log within Microsoft 365. The new Purview admin center (also known as the Compliance admin center), PowerShell, and last but not least via API (Office 365 Management and the Microsoft Graph API as well).
Searching via the Purview Admin Center (Compliance Center)
The first and one of the more common ways to perform searches within the unified audit log is to simply use the admin center. Navigate to the admin center at https://compliance.microsoft.com.

Under Solutions you’ll see a link to the Audit section. Click this to arrive at the search page of the admin center. If you haven’t turned on the unified audit log yet, it will ask you to record admin activity and user activity. Clicking this button will turn on the log ingestion and after a period of time (up to 60 minutes), you’ll be able to search and view the audit logs for your tenant.
To start a search you’ll need to select a time range (in UTC). Give the search a name, limit the scope of activities (optional), limit the scope of users (optional), and limit the scope to a name of a file, folder, or website (also optional).

There are some nuances with the time range to keep in mind. For example, there are limits on how far back you can search depending on the licenses of your users and if you have any add-ons for retention.
Provided your search is within the proper time range allowed, clicking the search button will queue the query. Once the query is complete, you can view the logs here or export them locally.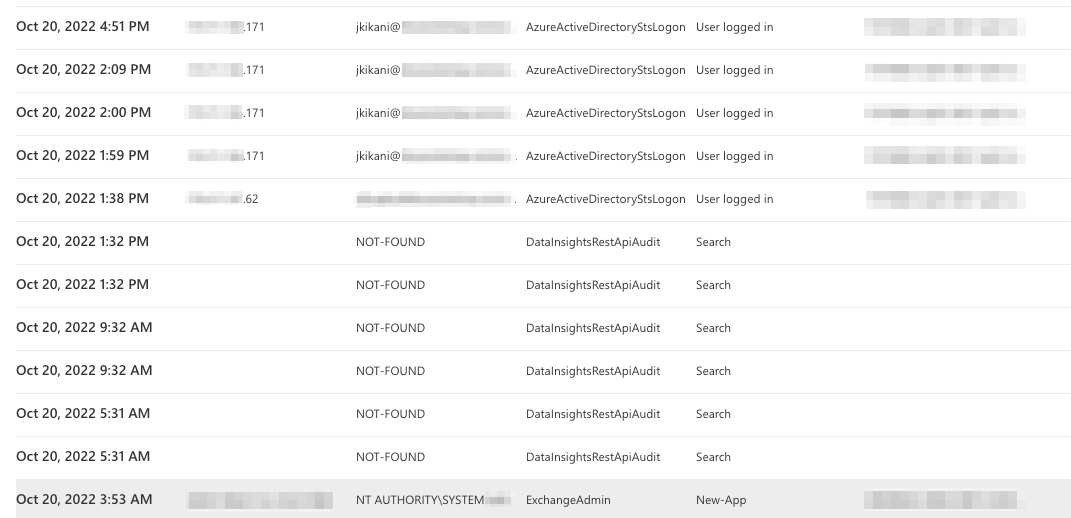
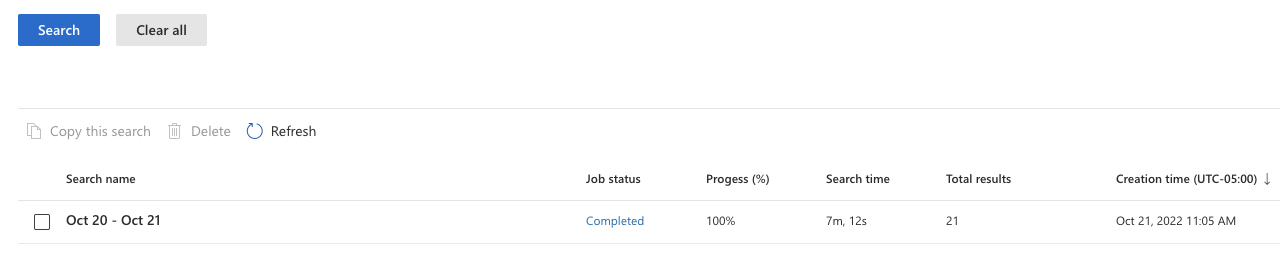
If this is a search you’ll be conducting again, the portal gives you the option to copy it and make adjustments before running the query again. Selecting the checkbox next to your search will highlight the Delete and Copy this search options.
Microsoft only allows you to view up to 50k events in the front end; these will be unsorted. In the event you don’t find what you need within those 50k events, you can export the results to a CSV file and open it in Microsoft Excel.
Searching via PowerShell
PowerShell gives you another option to search through your unified audit log within Microsoft 365 in a more flexible way. The benefit of using PowerShell is speed. Rather than waiting for the Admin Center to run, your search queries in PowerShell are much faster and you can pipe the results into other commands to export results or format them to your requirements.
There are some downsides, however. If you’re not familiar with using command line tools, this method could be awkward to familiarize yourself with. There is also a result size limit 100 being the default, with a maximum of 5000 records per search.
There are a couple prerequisites to this option first: you need to have PowerShell installed on your device or have the cloud shell configured within the Microsoft Admin Portal. For our purposes here, we’ll be delving into using PowerShell installed on a machine or virtual machine.
Instructions for downloading and installing PowerShell are widely available; Microsoft’s own documentation on this can be found Microsoft PowerShell installation guide for each OS. Once you have PowerShell installed and running, use the following steps to connect to Microsoft 365 using the Exchange Online PowerShell Module which you’ll also need to install.
First open a PowerShell session and run the following command to install the proper module to connect to Exchange Online. You may need to install WSMAN as well.
Install-Module-NameExchangeOnlineManagement
You’ll be presented with an output that will look similar to the following.
Untrusted repository
 You are installing the modules from an untrusted repository. If you trust this repository, change its InstallationPolicy value by running the Set-PSRepository cmdlet. Are you sure you want to install the modules from 'PSGallery'?
[Y] Yes [A] Yes to All [N] No [L] No to All [S] Suspend [?] Help
Type in Y to affirm the selection to proceed with the installation. Once that is completed, you’ll be able to connect to Exchange Online PowerShell using the module. Run the next PowerShell command to import the module.
Import-Module ExchangeOnlineManagement
From here you can now connect using the Connect-ExchangeOnline command, where you’ll be asked to authenticate.
There are additional options that you can take advantage of when using this command to customize your experience. More information on connecting to Exchange Online PowerShell can be found Exchange Online PowerShell connection guide.
Now that you are connected to Exchange Online PowerShell, you can search the unified audit log using the following commandlet (cmdlet).
Search-UnifiedAuditLog
 -EndDate <ExDateTime>
 -StartDate <ExDateTime>
 [-Formatted]
 [-FreeText <String>]
 [-IPAddresses <String[]>]
 [-ObjectIds <String[]>]
 [-Operations <String[]>]
 [-RecordType <AuditRecordType>]
 [-ResultSize <Int32>]
 [-SessionCommand <UnifiedAuditSessionCommand>]
 [-SessionId <String>]
 [-SiteIds <String[]>]
 [-UserIds <String[]>]
 [<CommonParameters>]
Breaking the cmdlet above down further, we can see that the-EndDate is a required parameter as well as the -StartDate parameter. The other parameters listed are optional and can be used to customize your specific query and narrow the scope, more specifically. More information on each of these parameters can be found Search-UnifiedAuditLog cmdlet reference.
Searching via the API
The last option that you have to query or search the Unified Audit Log is with the Office 365 Management API. With this API, you can create your specific queries to pull the data into a webhook, custom application, or third party application (like a SIEM). This gives you flexibility to get the data straight into an application or tool that you prefer to store and analyze the data therein.
Depending on if you have a Government Community Cloud (GCC) tenant or regular consumer tenant, the API calls can be different. More information on what you can do with the Office 365 Management API and the supported schemas can be found Office 365 Management API documentation.
Security information and event management (SIEM) platforms are one of the potential applications that will use a direct API connection to gather Microsoft 365’s Unified Audit Log data. These tools often require you to configure some permissions such as an app registration, and will oftentimes also ask for some tenant identifiers to properly complete the API configuration process.
Once done though, there is limited need to make adjustments and you can rest easy knowing that your data is being pulled in. Some SIEMs — like Blumira — can even alert you or show you if there are problems with the API connection so you can remedy them quickly. These tools can also make the outputs easier to search rather than looking through raw JSON logs. Combined with detection rules (custom or out-of-the-box) SIEMs can provide even more value on top of the Unified Audit Log.
Using Blumira to Extend the Power of the Unified Audit Log
All of the various search methods above will return JSON during typical queries or exports. JSON is organized well but if you’re not accustomed to parsing through that data or you don’t have time, Blumira is a great option.
As a cloud-based detection and response platform, Blumira does things differently by providing more value for better security outcomes, including:
- Automate Tasks For You – We do all the heavy lifting for your team to save them time, including parsing, creating native third-party integrations, and testing and tuning detection rules to reduce noisy alerts.
- Faster Time to Security – Our unique approach to detections notifies you of threats other security tools may miss, sending you real-time alerts in under a minute of initial detection to help you respond to threats faster than ever.
- Easily Meet Compliance – With a year of data retention and deployment that takes minutes to hours, we help you meet cyber insurance and compliance easily and quickly with the team you have today.
Blumira’s Free Edition can be configured and set up in about 10 minutes, and you’ll have access to our detection rules written by experienced Incident Detection Engineers. You’ll be able to see and respond to suspicious activity for free. There’s no need to deal with the slower or cumbersome Admin Centers and PowerShell.
More from the blog
View All Posts
Security How-To
15 min read
| November 22, 2022
Office 365 Audit Log Retention: Why It Matters and Best Practices
Read More
Security How-To
20 min read
| November 15, 2022
A Guide To Microsoft Azure Security Logging
Read More
Product Updates
6 min read
| June 11, 2025
New Detection: Catching Session Token Theft in Microsoft 365
Read More