- Product
Kindling
Product Overview
Sophisticated security with unmatched simplicityCloud SIEM
Pre-configured detections across your environmentHoneypots
Deception technology to detect lateral movementEndpoint Visibility
Real-time monitoring with added detection & responseSecurity Reports
Data visualizations, compliance reports, and executive summariesAutomated Response
Detect, prioritize, and neutralize threats around the clockIntegrations
Cloud, on-prem, and open API connectionsXDR Platform
A complete view to identify risk, and things operational
- Pricing
- Why Blumira
Why Blumira
The Security Operations platform IT teams loveWatch A Demo
See Blumira in action and how it builds operational resilienceUse Cases
A unified security solution for every challengePricing
Unlimited data and predictable pricing structureCompany
Our human-centered approach to cybersecurityCompare Blumira
Find out how Blumira stacks up to similar security toolsIntegrations
Cloud, on-prem, and open API connectionsCustomer Stories
Learn how others like you found success with Blumira
- Solutions
- Partners
- Resources
December 23, 2022
Traditionally you can protect devices on your local network with a firewall. But how do you know if your firewall is working? Or if it’s even working in the way that you configured it?
Firewalls don’t protect against every attack, and some attackers target firewalls, poking holes to make their attacks easier. This is where scanning comes in.
Scanning with Nmap is an easy way to peek into your network and see exactly what services that server or desktop is making available.
In this article, we’ll walk you through using Nmap to find vulnerabilities in your network.

What Is Nmap?
Nmap is one of the most popular and versatile network scanners for both attackers and defenders. It originally started as just a tool for viewing open TCP and UDP ports, but has grown into the bread and butter network scanner for IT professionals and attackers.
Nmap was first released just on the unix operating system in 1997. In 2000, a version for Windows was added. From there, the open source project was continuously improved on and added to by the security community.
Nmap can now scan pretty much anything if it runs on a network, and even has a built-in scripting language. Nmap scripts, also known as NSE scripts, are like the evolved Pokemon version of Nmap. We won’t quite need them for basic scans, but as your scanning needs evolve, they are great for automating and finding complex or specific vulnerabilities in your environment.
Ports, Explained
Before we go any further, it’s important to discuss a very important component to network scanning: ports!
Ports are essentially the holes that route different kinds of data and web traffic on a network. If an IP address is like the physical address of your house, then ports are the various doors and windows that let things in and out.
Web traffic on the internet in your browser even runs on ports. For example, if you type https://blumira.com into your browser’s URL bar and hit enter, the browser is actually slapping the port right on the end of that URL. This is because HTTPS and many others generally run on what is called a standard port. In this example, your browser is actually requesting https://blumira.com:443. The :443 refers to the HTTPS front door, and tells the traffic where to go once it reaches your house. This is also true with IP Addresses; 8.8.8.8:53 refers to the DNS port on Google’s main DNS server.
The port’s status — open, closed, or filtered — refers to the traffic a port accepts, similar to having security at your front door. Either no one gets in and the port is closed, the port is open and everyone gets in, or it’s filtered and only certain people are let in. Filtering is generally the job of a network or software firewall, and can be done on the network or the device itself.
The services running on those ports are generally one of two types: UDP or TCP. For this article, we will just note the main difference: UDP typically refers to one-way communication (sending a letter) and TCP is two-way communication (using the phone). This matters when scanning because Nmap will generate very different results and options for TCP vs UDP.
Now that we know a bit more about ports, wouldn’t it be great to have a list of them and what they do? Nmap actually keeps a list and regularly updates it. However, port numbers are mostly arbitrary and not specifically tied to a certain service. So, for example, HTTPS may run on port 8443 instead of 443 or HTTP on port 8080. The port number is generally left up to the operating system and software listening on that port. Nmap does its best to try and discover the service as well as the port.
It’s important to understand the difference between a local network and publicly-facing networks. Some services have a very different security and risk context when exposed publicly vs locally.
Here are services and their default ports that would potentially dangerous if exposed to the internet:
- SSH | Default Port: 22
- RDP | Default Port: 3389; sometimes 80 and 443 to handle authentication
- DNS | Default Port: 53
- SMB | Default Port: 139 (Older version), 445 (Newer TCP-based version)
- FTP | Default Port: 21
- HTTP | Default Port: 80 or 8080
- HTTPS | Default Port: 443 or 8443
- Web Application Administration | Default Port: 8080, 8443
Here are port ranges to be aware of:
- 1-1023 are the “well-known” ports we referred to earlier.
- 1024-49152 are called registered ports. These ports have varying reliability when trying to figure out what service is running on them.
- 49152–65535 are known as dynamic ports, so they are usually randomized within this range. Bittorrent is one example that uses this range.
You can also use Wikipedia’s list of common port numbers to service mappings as a starting point.
How To Install Nmap
You can install nmap on many different device types, including a laptop, desktop, server or even a Raspberry Pi.
- First, go to https://nmap.org/download and follow the instructions to download the latest stable version for your operating system. If you’re wondering why the site looks so outdated, that’s because it is quite old but still going strong to this day. If you are looking for a desktop GUI version, that is called Zenmap and it is pre-selected as an option with the Windows installer.
- Confirm Nmap working by launching your preferred command line tool like CMD or Terminal and typing
nmap -Vto print out the version installed. Alternatively, you can launch Zenmap from your applications folder or program files folder. - If you have issues, or if typing in nmap returns an error that the command is not found, make sure you did not install it in an alternative location. If so, just change directories in the command line to that location and try again.
If you’re running an EDR solution on the same device, it may generate some alerts once Nmap is installed or when you begin scanning. This is because attackers use Nmap as well. You can simply acknowledge the alerts or mark them as resolved. If you’re performing regular scanning from the device or automating the scans, you may want to create a false positive rule just for that device if possible.
Getting Started With Nmap
Now that Nmap is installed, let’s get scanning!
First, fire up your command line or GUI. Typing scanme.nmap.org will perform a default scan for open ports on the domain name scanme.nmap.org. Nmap provides this server to test out different scans.
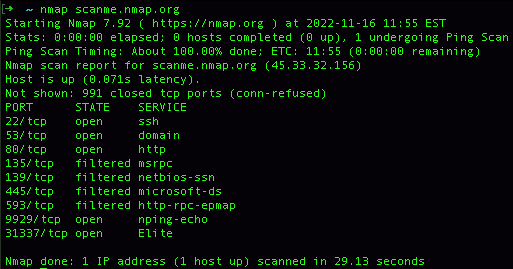
If you want to scan something else, type in the device’s DNS name or IP address. Later, you can type in a whole subnet that translates to “scan everything in this network range.” You can even scan the device Nmap is installed on from within. For that, type the hostname, localhost, or the IP 127.0.0.1 into Nmap’s command’s line.
Going Beyond Default Scanning
Default scanning is not an ideal way to detect an attacker poking around on your network. The goal is to find and remediate weak spots or vulnerabilities in your network before an attacker finds them. The biggest difference between a normal scan and how most attackers scan is all in the pings.
When we run basic Nmap with no options, Nmap first sends a ping to the device to determine if it’s online before performing time consuming and not-so-stealthy scans. However, most modern firewalls — even built-in desktop ones — have a feature that ignores random pings from other devices. That will shut down any results for a big portion of devices on your network.
Attackers can circumvent this with a technique called syn scanning. Syn scanning bypasses that ping, and just reaches out directly to each port and asks if it’s open. A threat actor sends a syn packet with a request to connect on whatever port they want.
Because of the way TCP protocols work, the device is supposed to respond with a syn/ack packet that tells the scanner whether they can connect. If the device was blocked, or if the port was closed, the targeted host sends an rst/ack packet that basically means ‘go away.’ Once Nmap receives that response, it sends another packet known as a rst, which essentially translates to “I changed my mind about connecting.”
An attacker using syn scanning is similar to a burglar going around a neighborhood and quietly checking every door and window to see who was home and if any of them are open. The ping approach, on the other hand, is like ringing every doorbell and causing a scene.
How To Perform Syn Scans In Nmap
To get the most out of Nmap from a security perspective, it’s crucial to use flags. Think of flags as settings or commands telling Nmap how to work. Flags usually begin with – or –. Nmap has two different flag categories, scan types and options. This is normally formatted like nmap [ -type ] [ -option ] [ target ].
Running certain scans will require administrator privileges, so in Windows it’s best to start by running as admin or in MacOS or Linux using sudo. To perform a basic syn scan, that would be nmap -sS scanme.nmap or sudo nmap -sS scanme.nmap
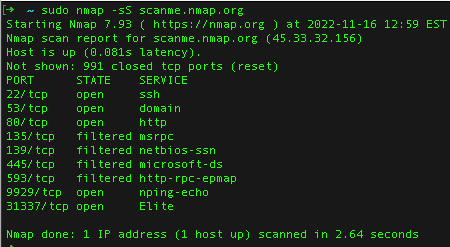
You can even combine most flags, but scan type flags only allow mixing TCP and UDP types. That would be something like nmap -sS -SU scanme.nmap.org
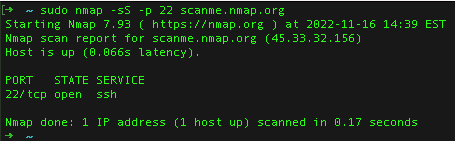
Let’s say you want to just check if SSH (port 22) is open on your firewall. Add the -p (for port) and give it the port number to check: nmap -sS -p 22 scanme.nmap.org
 The -Pn flag for scanning a single device is simple and does the majority of what most people need. It basically does a default mode scan, but without performing pings.
How To Scan Like An Attacker
First, identify your network subnets and the device you are scanning from. You need to either be on that network or be able to reach it. If a basic internal network has a device address of 192.168.0.1., you can scan that entire subnet by adding the network subnet and mask as the target mask: -sS 192.168.1.0/24.
To scan multiple subnets, just add them in together: nmap -sS 192.168.1.0/24 10.1.0.0/24
To scan the entire 192.0.0.0 or 10.0.0.0 space, just adjust the subnet mask as needed (for example, /16 pr /8). This will take a bit longer because we are checking every possible address.
If you would like to automate this, it’s important to understand Nmap’s different outputs. The two main outputs are a grepable format with the flag -oG or XML with -oX. Both options will want a filename and path afterwards; for example:
nmap scanme.nmap.org -oG /path/to/file.txt or nmap scanme.nmap.org -oX /path/to/file.xml
However if you leave that out ( nmapscanme.nmap.org-oX ) Nmap will just create a file with the hostname to the directory you are working in. If you’re planning on doing regular scanning you can use the flag –append-output to keep the same file and append results to the end like a log file.
So if we put that all together it might look like this.
nmap -sS -oG --append-output scan.txt 192.168.0.0/16
Don’t forget to add sudo or run as an administrator.
You can also identify host operating systems in Nmap by adding the -O flag. However, this is not 100% accurate and is mostly useful for determining which device that random IP address is associated with. It’s also not ideal for mass scanning, as it will be a bit noisy and add significant time to your scans. You are better off for any concerning open ports and then doing more scans to determine the OS. Understanding which real SIEM alerts fire during a penetration test helps defenders catch the same techniques when attackers use them in production.
Level Up Scanning With NSE Scripts
Once you’ve experimented with syn scanning, you can use NSE scripts to find vulnerabilities within your network. NSE scripts have a few use cases.
If you found a host with open RDP ports, you would want to know if that device is vulnerable to attack on that port. Nmap has plenty of specific vulnerability NSE scripts that can tell you if that device is vulnerable.
A catch-all script called vulners can also be useful. Scanning with that would look like this: nmap –script vulners scanme.nmap.org
This should output any vulnerabilities nmap can scan for and their related CVEs.
Because you can do all of this with a single command line tool, automation becomes fairly easy; run your desired script with something such as Task Manager for Windows, launchd for MacOS and cron for Linux.
This should give you a good baseline as well for what devices on your network are doing. You may be surprised at what you find — especially if you’re not running firewalls on each device.
Happy scanning!
Blumira: Security for IT Teams
Scanning with Nmap, and our free domain security assessment, can provide more visibility into your environment, but for more coverage you’ll need a threat detection and response solution. Blumira is designed for busy IT teams, with fast deployment and an easy-to-use interface that doesn’t require cybersecurity expertise. For teams running a SIEM without a dedicated SOC, automated detections mean port scans get flagged without anyone watching logs all day.
Our cloud SIEM with threat detection and response detects and alerts you about suspicious behavior in your environment so that you can stop an incident early enough to prevent damage. Each finding we send is accompanied with a security playbook, giving you clear recommendations on how to remediate an attack. Our support team of security analysts is always available to answer questions on how to interpret a finding, or for other security help.
Our free SIEM is easy to deploy; IT and security teams can start seeing immediate security value for their organizations.
More from the blog
View All Posts
Security How-To
14 min read
| August 19, 2024
How To Use Nmap for Network Inventory and Asset Discovery
Read More
Security Trends and Info
10 min read
| January 11, 2022
SIEM Alerts To Expect During a Pentest
Read More
Security How-To
10 min read
| October 25, 2021
Best Practices For Configuring Firewall Rules
Read More