- Product
Kindling
Product Overview
Sophisticated security with unmatched simplicityCloud SIEM
Pre-configured detections across your environmentHoneypots
Deception technology to detect lateral movementEndpoint Visibility
Real-time monitoring with added detection & responseSecurity Reports
Data visualizations, compliance reports, and executive summariesAutomated Response
Detect, prioritize, and neutralize threats around the clockIntegrations
Cloud, on-prem, and open API connectionsXDR Platform
A complete view to identify risk, and things operational
- Pricing
- Why Blumira
Why Blumira
The Security Operations platform IT teams loveWatch A Demo
See Blumira in action and how it builds operational resilienceUse Cases
A unified security solution for every challengePricing
Unlimited data and predictable pricing structureCompany
Our human-centered approach to cybersecurityCompare Blumira
Find out how Blumira stacks up to similar security toolsIntegrations
Cloud, on-prem, and open API connectionsCustomer Stories
Learn how others like you found success with Blumira
- Solutions
- Partners
- Resources
March 18, 2024
Welcome back to the Hedgehog Defense! In this post, we’re going to take a look at a common technique abused by threat actors to sneak past your typical mail filter and Windows defenses - automatic disk image mounting. Unintentionally, this is one of those, “Defenders hate this one easy trick!!!” deals. Fortunately, there are a couple quick and easy changes you can make to help defend yourself against this technique. I’ll be detailing how this feature is abused, why it works, and what you can do about it.
What is Automatic Disk Image Mounting?
Mostly everyone knows of the .iso file - these are basically disk images without the physical disk part. Administrators will typically write these to bootable media such as physical disks or USBs. However, disk images can also be mounted directly in Windows Explorer, allowing you to access contents directly without having to write to media. Native image mounting in Explorer was introduced with Windows 8 and has made it into every version since. This feature enables Windows to mount disk images such as ISO, IMG, VHD, and VHDX files with Explorer by default. You could do the same in versions before Windows 8, but third party applications were required. If there is one thing that attracts threat actors, it’s new features that were previously only possible through third party apps. A new built-in feature like this guarantees that people running Windows are now equipped with the tools by default and will be targeted.

How is it abused by threat actors “in the wild”?
So what’s the big deal? How could mounting a disk image possibly be leveraged by threat actors? The biggest advantages lie in the file type itself and not in its functionality. There are two primary reasons image files have been abused by threat actors:
- Image files have had an issue in the past with properly assigning “Mark of the Web” identifiers (more info in the next section)
- Not all mail filters will block image files by default or they may even be configured to allow them
Image file formats are unusual and uncommon vehicles for malware distribution. We all know how heavily scrutinized zip files are when it comes to emailing them around to other people or imagine trying to send an executable attachment. No matter who you send those to or how they have their mail filter configured, it’s unlikely those files will make it to the intended target recipient. Most mail filters will outright deny the email or strip the attachment. Furthermore, if those files do make it past the filter, they’ll probably be wiped out by an antivirus. Image files are not impervious to these defense tactics either, but due to their uncommon nature, some mail filters might not block them by default and more people may be willing to allow them since they don’t realize the danger. Users may be trained more to be on the lookout for the common malware file types and seeing an image file may lower their guard a little bit. It’s certainly not foolproof, but attackers will take any advantage they can get. Image files have also been observed being served via malicious advertising links.
Mark of the Web

Image files, like .ISO for example, previously had the ability to bypass a Windows security feature called “Mark of the Web” (MotW). This feature essentially marks files sourced from the internet with a special identifier. This identifier is used by Windows to handle files in a particular way. For example, if an Excel spreadsheet is downloaded from the internet, it will have the MotW identifier branded on it, essentially telling anyone who will listen that it originated from the internet. When a user tries to open this Excel file, Windows examines the MotW tag, acknowledges that it originated from the internet, and, as a result, processes the file through SmartScreen and opens the file in “protected view” . “Protected view” essentially puts the Excel file in a read-only mode where macros are disabled and no modifications can be made. When MotW is bypassed, Windows treats the file like a locally created file and does not handle the file in any special way. Threat actors like this because if they can get Windows to place some implicit trust in the file they’ve sent you, they can fly under the radar a little bit longer and get things to execute when they shouldn’t be able to.
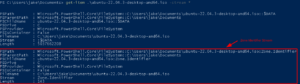
 Examining a local file, no Zone.Identifier data stream
 Examining the zone.identifier stream on a file downloaded from the internet
 Examining the zone.identifier stream on a file downloaded from the internet
Microsoft supposedly patched this particular MotW bypass strategy on November 8, 2022 (assigned CVE-2022-41091). While a fully patched version of Windows 10 does indeed mark the iso file as originating from the internet, I am unable to get the same report for the contents of the iso file once mounted. I’m not convinced this means these files aren’t tagged with the MotW zone.identifier, but just thought it was worth noting. Another reason to continue reading and take things a step further in terms of prevention.
 Examining data streams of a file contained within the mounted ISO
Defense Against the Dark Arts (Image Mounting)
If we remember anything about the Hedgehog Defense tactic, it was that we should be focusing on a “defense in depth” strategy and layering our defenses whenever possible. In the case of attacks based on image files, we have several things going for us already - mail filters, antivirus, user training, and Microsoft patches, but why not just prevent users from being able to mount image files altogether? Sure, there may be a handful of users who need it as a legitimate business need, but I would bet that most users could be blocked and would be none the wiser while working through their day to day tasks. It’s following the practice of least privilege - if they don’t need to mount images, don’t let them. Let’s take a look at how we would go about doing that.
There are two primary methods to mounting a disk image in windows - double click and right-click context menu “mount” option. I will be going over a couple ways that you can do both, however, there are some methods to do just one or the other. This may be better for your situation/environment, but just be aware of what you are enabling and that it is providing the kind of coverage you want.
Method 1 (recommended): Disable all the things (via GPO)!
The first method I’m going to detail is the “all-in-one” and the one that I would recommend. This will disable right click mounting, double click, and will also disable mounting via powershell. You can also configure this method to be overrode by administrators if desired. These steps come directly from this write-up by Mubix "Rob" Fuller. This option won’t visibily remove the “mount” option from the right click context menu, but will effectively disable its functionality.
[video width="1118" height="632" mp4="https://www.blumira.com/wp-content/uploads/2024/03/no_mount.mp4" loop="true" autoplay="true"][/video]
Eventually results in an error message:

Auditing Existing Usage
If you don’t want to fully implement the “scream test” and would like to first audit your environment’s existing usage of Windows disk image mounting, create and deploy a GPO to audit plug and play events. This GPO option can be found under Computer Configuration > Windows Settings > Security Settings > Advanced Audit Policy Configuration > Audit Policies > Detailed Tracking > Audit PNP Activity

Configuring and deploying this GPO will enable generation of Windows Event ID 6422. Of these events, you would specifically be looking for events related to SCSI\CdRomMsft____Virtual_DVD-ROM_ which would indicate the mounting of a disk image. Once you have that data, you can start getting a clear picture of who is using this feature on a regular basis and consider exempting them if there is a valid business need.
Configuring the GPO
To configure the GPO that is actually going to do all the blocking, follow these steps:
- Make a new GPO and browse to Computer Configuration > Administrative Templates > System > Device Installation > Device Installation Restrictions > Prevent installation of devices that match any of these device IDs

- Enable the GPO and check the box for “Also apply to matching devices that are already installed”.

- Click on the “Show…” button and then add the device ID SCSI\CdRomMsft____Virtual_DVD-ROM_

- Bonus - If you want Administrators to be able to override this setting, make sure you also enable the separate setting, “Allow administrators to override Device Installation Restriction policies”


- That’s it! Now assign this GPO out to whatever OU you want or deploy domain wide if you want everyone locked down. Remember that this is a Computer Configuration based GPO, so it must be assigned to a Computer OU.
Method 2: Change the default app for Image files (via GPO)
This next method provides slightly less coverage, but that may be more ideal for some environments. For example, this will still allow for right click mounting as well as mounting via powershell. This method will technically remove the right-click “mount” context menu option, but you can still hit “open with explorer” and it will mount. It’s accomplished by changing the default app associated with image file extensions, in this case - ISO, IMG, VHD, and VHDX. If this looks familiar, it’s because it’s the same technique I detailed in the last Hedgehog Defense. I won’t go super into detail since my previous blog post details all of that, but you would essentially just assign these files types - ISO, VHD, VHDX, and IMG files to open with something innocuous like notepad (...with these file association strategies, maybe we should refer to it as “nopepad”?). It also must be noted that users can manually set the default app back to explorer and bypass this method of prevention.
[video width="1736" height="912" mp4="https://www.blumira.com/wp-content/uploads/2024/03/notepad_mount.mp4"][/video]
Method 3: Remove “Mount” Context Menu Item and Disable Double Click Mount via Registry
The third and last method I will be discussing is accomplished with a simple registry edit. This method will completely remove the right click “mount” context menu option and disable double click mounting, but will still allow for mounting via PowerShell.
- Open registry editor and browse to HKEY_CLASSES_ROOT\Windows.IsoFile\shell\mount
- Right click and create new Key (REG_SZ) named ProgrammaticAccessOnly
- To cover VHD and VHDX, add the same key to HKEY_CLASSES_ROOT\Windows.VhdFile\shell\mount
- That’s it, a reboot isn’t even needed

Now, when you right click, the “Mount” option is missing and double clicking results in opening the file with the disk burner (which also disables the attack flow).
[video width="1122" height="632" mp4="https://www.blumira.com/wp-content/uploads/2024/03/reg_no_mount.mp4" loop="true" autoplay="true"][/video]
Obviously, if you’re deploying this en masse, you’ll have to find a way to automate this process, but many RMMs have this ability. You can also deploy registry changes like this via GPO. That is out of scope of this article, but there are plenty of guides online that can help with automating and deploying registry changes.
Proof of Concept
Now let's take a look at these things in action in a simulated attack. In this example, our poor victim, Hank, received an email asking him to review a file on his company's file share. Unfortunately, the link sent to him is spoofed to look like it's local to his network, but it's really reaching out externally to download the iso. Upon downloading the iso, Hank clicks on it to open it (as most people would do) and it mounts the iso. From there, he double clicks the "Document" shortcut which runs the payload and establishes a connection with the attacker.
[video width="2426" height="1052" mp4="https://www.blumira.com/wp-content/uploads/2024/03/PoC_Before.mp4"][/video]
Now that we know what a successful attack looks like, let's see what happens if Method 1 was deployed.
[video width="1280" height="720" mp4="https://www.blumira.com/wp-content/uploads/2024/03/PoC_after_edit.mp4"][/video]
In this situation, no matter how Hank tries to mount the iso file, it is unsuccessful. As a result, he is unable to access the contents and trigger the payload. No callback for the attacker this time!
How Blumira Can Help!
Now that you've learned how to stop this kind of attack - learn how to detect it! Blumira has a dedicated detection titled, "Potentially Malicious ISO file (LNK)" that will notify you should this kind of activity occur in your environment.
Learn more about how Blumira supports your cybersecurity strategy by trying out our free Blumira SIEM.
More from the blog
View All Posts
Blog
28 min read
| June 5, 2026
Microsoft Teams Helpdesk Impersonation Attack Explained
Read More
Blog
15 min read
| January 9, 2026
Microsoft 365 Security Best Practices: A Prioritized 2026 Guide
Read More
Security How-To
1 min read
| November 14, 2025
Proven Ways to Take Control of Windows & Entra Security
Read More